Low Back Pain in Golf

golf low back pain


This post is taken from my other blog, Golf Rehab Doc.  Check it out if you are interested in rehab, injuries, and performance information specific to golf.  To go to the site click —> HERE.  Thanks for reading!

Low back pain (LBP) is consistently cited as the most common injury among golfers.  This statistic has lead many researchers to conduct studies and formulate correlations between LBP, physical characteristics of the golfer and swing faults.  However, it should be noted that many authors admit that LBP is a multifaceted condition that is difficult to control in scientific research. Furthermore, it is not within the scope of this post to review the anatomy and pathophysiology behind different medical diagnoses (ex. disc herniation, muscle strain, etc.) in regard to low back pain.  However, it has been well documented that treatment should not performed with only the medical diagnosis in mind and that each individual should be evaluated.  With that said, the following is a summary of different mechanisms that have been found to contribute to low back pain in golfers.

RANGE OF MOTION

  • Hip Internal Rotation: It has been concluded that decreased lead hip IR may contribute to LBP in golfers.
    • This was found in both pros and amateurs.
    • Reduced hip IR may cause compensation of over rotation of the trunk.
    • Likewise, improving lead hip IR has been found to reduce low back pain (Grimshaw and Burden, 2000)
    • To start the process of testing your hip internal rotation click —> HERE
  • Hip External Rotation: There is an established correlation between decreased lead hip FABER range of motion and LBP.
    • This was only for professional golfers, but not for amateurs.
  • Non-Lead Hip Range of Motion:  No correlation in amateurs or professional golfers.
  • Lumbar Extension:  Decreased lumbar extension has been shown to correlate to a history of LBP.
    • The test for this is an easy one.  Lay on your stomach (prone) and place your hands under your shoulders as if you were going to do a push-up.  Without lifting your pelvis off of the table, straighten your arms as if to stretch your back.  If you are unable to full extend your elbow (or come close to it) without having your pelvis rise off of the ground, you have limited lumbar extension.
  • Lumbar Flexion: There was no correlation between decreased lumbar flexion ROM and a history of LBP.
  • Trunk (Thoracic) Rotation: Golfers with LBP have less rotational flexibility in the trunk (Lindsay and Horton, 2002).
    • How can I test my trunk rotation?  Glad you asked.  Click —> HERE.
    • The test video from TPI does not fully isolate the thoracic spine, but it can tell us if we need to assess further to isolate the thoracic spine.
  • Toe Touch: An inability to perform a toe touch was also related to LBP in one article.  To see how to perform this test click —> HERE.

SWING FAULTS

  • Reverse Spine Angle: Usually a compensatory pattern that results from decreased hip or trunk rotation (see above).
    • For an example of this swing fault, check out this video from TPI —> HERE.
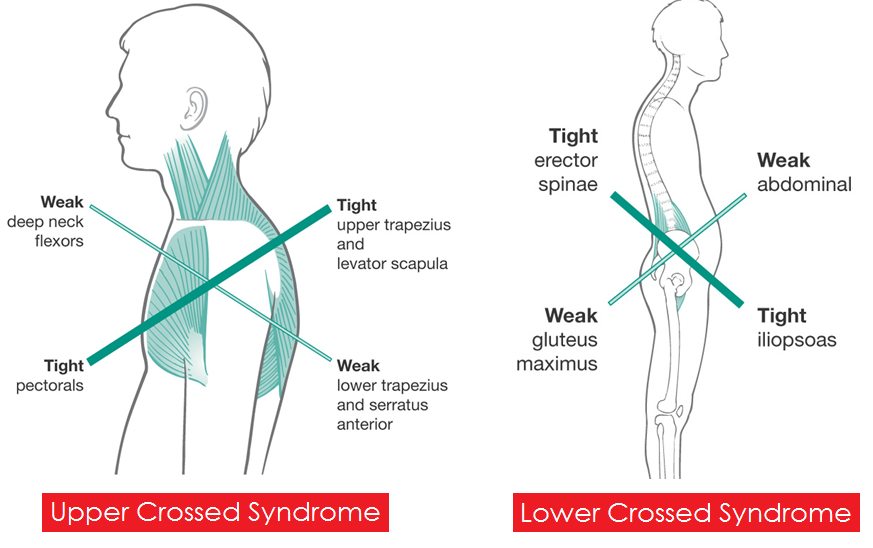
  • S – Posture: In the world of orthopedics, this is also called lumbar lordosis.  It has also been coined “lower-crossed syndrome.”
    • This posture places the lumbar spine in hyper-extension and a video example is —> HERE.
  • C – Posture: This is a posture that places the lumbar spine in flexion.
  • Hanging Back: Considered to be a potential swing fault for various reasons, I find it is due to lack of lead hip internal rotation or lack of stability/ balance on the left leg.
    • This lack of hip internal rotation or stability decreases the player’s ability to transition to the lead side and complete the follow-through.
    • A great demonstration is found —> HERE.
  • Early Extension: Another swing fault due to reduced lead hip internal rotation.  There are physical parameters and screens that correlate to this swing fault.  However, here is an in depth overview of this swing fault —> HERE.

MUSCLE STRENGTH/ STABILITY

Even though range of motion and technique is very important in the golf swing to protect the spine, we cannot forget about strength and stability in the lower extremity and core.  It is well documented that strength and power can improve performance, but we need to remember that it can also reduce the risk of injury.  Without going into excessive detail, the lower body and core should have adequate stability in order to attenuate considerable amounts of load on the spine during the back-swing, impact, and follow through.  Several tests can be helpful to detect core and lower extremity stability deficits.

  • Single Leg Stance: a test for overall balance that can highlight any side to side asymmetries —> Click HERE.
  • Bride with Leg Extension Test: a great test for lumbo-pelvic-core stability especially gluteal function is shown —> HERE.
  • Trunk Stability Push-Up: tests the ability to stabilize the spine in an anterior and posterior plane during a closed-chain upper body movement.  An overview of this test is —> HERE and reasons why its important are —> HERE.


Resources

Grimshaw, P., Burden, A. M. (2000). Case Report: reduction of low back pain in a professional golfer.  Medicine & Science in Sports & Exercise, 32, 1667-1673.

Lindsey, D., Horton, J. (2002). Comparison of spine motion in elite golfers with and without low back pain. Journal of Sports Science, 20, 599-605.

Murray E, Birley E, Twycross-Lewis R, Morrissey D. The relationship between hip rotation range of movement and low back pain prevalence in amateur golfers: an observational study. Phys Ther Sport. 2009;10(4):131-135.

Vad, V. B. (2004). Low back pain in professional golfers: the role of associated hip and low back range-of-motion deficits.  American Journal of Sports Medicine, 32, 494-497.

Leave a comment

Filed under Uncategorized

3 Things That I Have Learned Since Graduating From PT School

Ask almost any physiotherapist and they will tell you that one of the great things about our career is that you literally can learn something new every day.  This is important because staying up to date on current research helps to provide the best care possible for our patients.  I have only had my PT license for approximately one month, but I have already learned 3 things that change the way I assess/treat patients compared to what was taught in school and on the boards.

#1 – Arthrokinematics are important, but probably not as important as we think.

Arthrokinematics is a topic that I have written extensively about in the past. See link and post for more details. https://lukedelorenzo.wordpress.com/2011/07/27/arthrokinematics-an-important-biomechanical-concept/. Arthrokinematics is a biomechanical concept that explains joint motion during physiological movement of bones (osteokinematics).  Understanding each and every joint arthrokinematic movement was said to be very important in the direction of joint mobilization interventions.  This is why we had to memorize them in school and to pass the boards.  However, as I more recently discovered, they may not be as important as we thought.  I am not saying by any stretch that I wasted my time.  As a matter of fact, memorizing each one probably helped me to become a better clinician and I would be lying if I said that I have abandoned this concept all together.  But, I can say that it is much less important to me.

ArthrokinCKCTibFemJoint

Not sure that this quite covers it…

There are two main methodologies that have brought me to this new conclusion.  They are the Maitland and McKenzie Approaches. The Maitland Approach bases most of their evaluation process on a “comparable sign,” and McKenzie talks extensively about repeated motions and a direction preference.  While they are dissimilar in some ways they both agree upon the importance of the subjective and objective portions of the evaluation, and having a baseline to measure outcome effects.  Maitland’s baseline is the “comparable sign” which is simply the reason or symptom for the patient being in the clinic.  For example, if a patient perceives pain when he rotates his trunk to the left this is your “comparable sign.”  You simply perform some type of intervention and then retest the “comparable sign.”  If the patient has improved, continue or progress the intervention.  Simple.  The other thing that Maitland is teaching is that you do not have to perform the intervention based on biomechanical principles.  Without going into too much detail, research is allowing us to understand that most treatments work because of some type of neurophysiological effect.  This does not mean that biomechanics or arthrokinematics or tissue extensibility is not improved, it just means that something happened and we can really be sure what it was.  McKenzie attempts to place a patient in a category based on a systematic evaluation process.  Once sub-grouped, a movement preference is established and repeated movements are commenced.  Once the movements are performed, the baseline is re-tested to measure effectiveness.  An example of this is how a patient with a limitation into DF may be given repeated end range PF.  As long as the patient was sub-grouped into the correct category, outcomes are usually good.  And, needless to say, it does not directly follow biomechanics principle.  Another example is thrust joint manipulation.  Recent research suggests that specific thrust techniques result in a similar outcome to general manipulations.

The McKenzie Approach is a lot more than just this…

#2 – Screening the joint above and the joint below probably is not enough

The second point is based on a concept called “Regional Interdependence” (RI).  A concept that was covered in school and on the boards.  RI means that an area of the body distant to the area of interest can be causing the dysfunction or symptoms.  In other words, your knee pain may not be from a structure in your knee.  In school, we are taught about RI for situations such as neck dysfunction causing shoulder, elbow, or hand pain, and low back dysfunction causing hip, knee, or foot pain.  But, there may be more to it.  Recently, I attended the level 1 SFMA course which goes into great detail about regional interdependence and the importance of assessment movement patterns.  For anyone interested in my opinion, the SFMA was awesome, but to use the breakouts in their entirety in the amount of time usually given for an eval (45-60 minutes) will take some practice.  Anyways, if we are going to truly embrace the RI concept we have to look at the whole person.  If someone has knee pain we should understand that screening the hip and the ankle is incomplete especially if we do it passively.

SFMA

Standard operating procedure?  It just might be.

____________#3 – Pain is an output__________________

neuromatrix

Pain research is a very popular topic these days.  With principles such as “the neuromatrix” and “the biopychosocial model” we are fairly certain that pain is multifaceted and that basic pain teaching that begins and ends with nociception is incomplete.  I will be the first to admit that I have only touched the tip of the iceberg when it comes to understanding this concept, but the common suggestion is that the amount of pain felt (or more appropriately, perceived) is not always proportionate to the extent of tissue damage.  A great example was given in a video lecture that I saw from Dr. Lorimer Moseley, a physio and researcher who has helped bring these concepts to light.  In his lecture, Dr. Moseley discusses how he was walking in the woods and felt a pinch on his leg.  He assumed it was a stick, did not feel pain and did not think anything of it.  He continues to explain that the next thing he remembered was waking up in the hospital two days later!  The small pinch from the stick was actually a poisonous snake.  A few years later he was walking in the same woods, and felt a pinch in similar portion of his leg.  Immediately he was screaming and rolling on the ground in excruciating pain.  This time, it was a stick.  His point is that his previous experience increased his perceived threat and his brain created a larger pain output response.

Leave a comment

Filed under Uncategorized

Postural and Structural Adaptations in Hockey Players

As you know, hockey is a fast paced, aggressive game that warrants a specific skill set and physiological attributes.  This inherent physical demand makes these athletes susceptible to certain postural and structural adaptations which may result in subsequent injury.  On one hand, the intensity of the game is a great way for athletes to get exercise, and usually results in a strong, well conditioned athlete.  Conversely, the sustained posture of skating and high force production required for proper technique and propulsion yield several risk factors for injury.  The good news is that these risk factors are modifiable.

First, the position required for skating (including goalies) is very similar to that of any “athletic” position in sports (think ready position in baseball or defensive position in basketball).  However, the problem is that the demands of the game require that hockey players sustain this position for a much longer period of time (45-60 second shifts).  To make matters worse, once the player is done with their shift they rest on the bench in a similar position.  So, for approximately 60-180 minutes (depending on length of game), hockey players are in this flexed hip, forward head, rounded shoulder position.  This is very similar to sitting at a desk, which by the way, is exactly what student athletes do for hours per day.  Several terms have been coined to describe the resultant posture but two popular terms are Upper Crossed Syndrome and Lower Crossed Syndrome [3].

Upper crossed syndrome presents as increased thoracic kyphosis (hunched back), rounded shoulders and a forward head, and lower crossed presents as anterior pelvic tilt and increased lumbar lordosis (arched low-back).  While some support the thought that these postures will result in pain, the research remains controversial [2].  On the other hand, evidence does support that specific muscle imbalances accompany these postures, which may result in pain because of poor movement quality and overuse [3].

While there is a “tug-of-war” taking place between the front and back of the body in hockey players, a similar battle is going on between the inside and outside of the hip and across the pelvic.  Recent research has concluded that hockey players who have adductors (inner thigh muscles) that are less than 80% the strength of their abductors (outside hip muscles) have 17 times the chance of sustaining an adductor strain [6].  This makes sense because of the large lateral and rotational component of the hockey stride.  Furthermore, sports hernias (a.k.a. athletic pubalgia) are prevalent in ice hockey players and can lead to decreased participation and even surgery.  The diagnosis and treatment is complex, but the cause is theorized to once again involve an overuse syndrome and imbalances in soft tissue pull on either side of the pubis [1].  This particular “tug-of-war” that may result in athletic pubalgia is between weak abdominal musculature and fibrotic/ tight adductor muscles.


Another structural adaptation in hockey players is the prevalence of Femoroacetabular Impingement (FAI).  FAI is simply the bony overgrowth of the the ball and/ or socket of the hip joint that can lead to hip labral tears and pain. FAI presents as decreased hip flexion and internal rotation range of motion, among others. We have known for several years about the prevalence of FAI in symptomatic and asymptomatic hockey players [5].  However, a recent study shed some light on the fact that FAI is progressive.  The study looked at youth hockey players from 10-18 years of age, and compared their age to prevalence of FAI and labral tears.  The results are eye opening, to say the least.  The table below summarizes the findings [4].

Age

        Level in Hockey

     FAI Prevalence

       Labral Tear Prevalence

10-12

       Pee-Wee

          37%

                    48%

13-15

        Bantams

          63%

                    63%

16-19

        Midgets

          93%

                     93%

Again, it was not reported if these athletes were symptomatic, but this should not matter.  Remember that FAI is a bony abnormality and presents with decreased range of motion in the hips.  Therefore, it is impossible to “stretch” someone into new ranges if they have FAI because those ranges will not be available.  Furthermore, appropriate exercise accommodations and individualized programming must be made to ensure that the athlete does not approach end range during weight training sessions.

The intention of the above information is not to deter someone from playing ice hockey.  Injuries may occur in all sports.  However, attention should be drawn to the importance of a professional strength and conditioning program, and the fact that all training programs are NOT created equal.  A comprehensive assessment process and subsequent programming allows the coach to modify the above risk factors,  deliver individualized programs, and help hockey players develop the attributes necessary to enhance their on-ice performance.

References

1. Hackney RG. The sports hernia: a cause of chronic groin pain. Br J Sports Med. 1993;27(1):58-62.

2. Lewis, J. S., Wright, C., & Green, A. (2005). Subacromial impingement syndrome: The effect of changing posture on shoulder range of movement. Journal of Orthopaedic and Sports Physical Therapy, 35(2), 72-87.

3. Page, Phillip, Clare C. Frank, and Robert Lardner. Assessment and Treatment of Muscle Imbalance: The Janda Approach. Champaign, IL: Human Kinetics, 2010. Print.

4. Philippon, et al. (2013). Prevalence of increased alpha angles as a measure of cam-type femoroacetabular impingement in youth ice hockey players. American Journal of Sports Medicine, 41(6), 1357-1362.

5. Silvis, et al. (2011). High Prevalence of pelvic and hip magnetic resonance imaging findings in asymptomatic collegiate and professional hockey players. American Journal of Sports Medicine, 39(4), 715-721.

6. Tyler, T. F., Nicholas, S. J., Campbell, R. J., & McHugh, M. P. (2001). The association of hip strength and flexibility with the incidence of adductor muscle strains in professional ice hockey players. American Journal of Sports Medicine, 29(2), 124-128.

1 Comment

Filed under Uncategorized

Talocrural Joint Self Mobilization: A Better Way?

stabilize talus, mobilize tibia...if only we had a PT with us all of the time!

The term mobility has become a popular topic over the past few years, and for good reason.  Long before I took my first anatomy course I was under the assumption that if I was “tight” (a.k.a. lacking ROM) in a specific direction that I should stretch the musculature responsible for the deficit.  While this is not incorrect, it is often times only part of the equation–especially for people who assume static or restricted positions for long periods of time.  An area that is susceptible to ROM deficits is the ankle, and more specifically decreased dorsiflexion (bringing your toes to your shin).  Examples of this population include but are not limited to students and office workers who sit at a desk during the day, athletes who wear a restrictive boot during their sport (hockey players, skiers, etc.), and anyone whose profession keeps them in a plantarflexed  or neutral position.

While we know that muscle tissue will adaptively lose viscoelastic properties when maintained in a short position; we often forget that inert or non-contractile structures, most notably the joint capsule will do the same.  Therefore, if we have assessed that the dorsiflexion (DF) deficit is secondary to tight inert structures and not musculature, joint mobilization can be very helpful.

When deciding to use joint mobilization as an intervention, the principle of arthrokinematics of the ankle must be considered.  I wrote extensively on this topic in an earlier post.  To review please select the link  https://lukedelorenzo.wordpress.com/2011/07/27/arthrokinematics-an-important-biomechanical-concept/.

To summarize, select the joint you wish to mobilize, figure out which articulating surface is concave and which is convex, observe which surface is moving and which is fixed, and finally, facilitate glide of the moving structure OR stabilize the fixed structure.  Previously, I have suggested than during a closed chain movement of DF at the Talocrural Joint (TCJ), the tibia should be facilitated to glide anteriorly based on the biomechanical principles of the tibia rolling and gliding in the same direction on a fixed talus.    When I suggested this to my friend, he noticed that he was getting a small amount of impingement in his anterior ankle.  I started to experiment and came up with a way to stabilize the talus while moving the tibia.

Without getting too detailed, if the posterior capsule of the TCJ is tight, the talus will ride forward with the tibia during DF, thereby limiting the ROM and causing the heel to lift off of the ground.  In my example, using a strap to stabilize the talus should facilitate DF without giving a sensation of impingement, and subsequently giving a stretch to the gastroc-soleus complex.

In the video below, I show a visual example.  I drew a line under my medial malleolus (ankle bone) to emphasize where the strap should be placed.  Based on the orientation of the joint, if you place the strap over the ankle bone the talus will not be stabilized.  Please see the photo below to get a better idea.

The strap must be placed distal to the shin bones, and anchored to an inferiorly placed bar

Here is how to perform the technique:

1. Place bench directly in front of a bar with the surface of the bench higher than the bar

2. Place strap in appropriate position under malleoli

3. Anchor strap to bar to minimize anterior talar migration

4. Perform a lunging motion bringing the shin forward over the toes

Please select the link below to view the video and hopefully you find the exercise helpful!

http://www.youtube.com/watch?v=kIIiCGNmJ5k&feature=youtu.be

Leave a comment

Filed under Uncategorized

Exercises You Should Try: One Arm Push-up

I didn’t quite understand the “packed/neutral neck” position as a baby…

Today’s entry is a series that I will post from time to time.  In each installment, I will present one exercise and highlight its benefit to a program.  The topic I present could be a mobility or warm-up exercise, resistance or plyometric exercise, speed drill, or anything in between.  The purpose of this series is to give the reader a look at some exercises that may be totally new, challenging, or present a variation/ correction to an exercise that is already performed in their program.

Exercise:  One Arm Push-Up

Technique Cues: Neutral neck/ neutral spine, shoulders back and down (during the set up) , place two hands on bar/ floor in a standard bilateral push-up position and remove one arm.  The bar (if necessary) should be lowered and touched to chest at or slightly below the nipple line (similar to the bench press), the arm performing the exercise should replicate the normal mechanics of a push-up (scapula musculature resisting elevation/shrugging), scapula moving freely on thorax,  humerus less than 90 degrees of abduction based on desired outcome, etc).

Benefits:

1) Unilateral Upper Extremity Horizontal Pressing Strength

2) Anti-Extension Core Stabilization (because one must resist gravity pushing the hips toward the floor)

3) Anti-Rotation Core Stabilization (because of decreased points of stabilization–gravity pushing contralateral should to floor)

4) Rotator Cuff (RC)/ Scapular Stabilizer (SS) Musculature Activation to Ipsilateral Arm (because of decreased stability)

Note: Most may already know benefits 1 and 4 from above, but 2 and 3 are often forgotten when it comes to the push-up.  During a standard push-up and its variations (as in this exercise) gravity is pushing the hips and low back toward the ground.  Therefore, in order to  stay in neutral alignment the athlete must activate his or her anterior core musculature to stay neutral (hence anti-extension).  Likewise, since one of the original four points of stability (two arms/two legs)  is being removed from the exercise, gravity will cause that shoulder to move toward the ground in a rotary fashion.  The athlete must strongly activate the abdomen, glutes, and legs to resist this rotation.  Lastly, I would like to discuss in further detail benefit 4.  The rotator cuff and scapular stabilizer musculature can be thought of as the “core” of the shoulder.  Much like the abdominal’s role in stabilizing the spine, the RC and SS have a primary function of centralizing the humerus inside the glenoid (ball and socket), as well as allowing for proper scapulohumeral rhythm.  Most may think that the RC is only meant to internally and externally rotate the arm, and that the SS’s only move the scapula, but this is only part of their function.    That is what is great about this exercise.  As you can see in the video below, I am not able to perform the exercise from the floor (like I used to when I was a baby), so by using a pin in a power rack or a smith machine, it is easy to regress the exercise.  In other words, I can start from a higher position, and as I get stronger (or want to increase the intensity) I can lower the bar.  If I am going for more volume (high reps/ sets), I can again raise the bar or pin.  The benefits and uses of unilateral training have been well documented, so I will not go into much more detail.  Take my word for it though; if you are only performing bilateral training in your program you are missing a crucial piece

Please select the link below for a video example and give the exercise a try…I think you will like it.

http://www.youtube.com/watch?v=xz9cSFEOAbs&feature=youtu.be

Leave a comment

Filed under Uncategorized

Barefoot Running Symposium Summary and Thoughts…

Today’s post is a summary of a lecture symposium that I attended a few months ago.  The lecturer was none other than Irene Davis, a well respected physical therapist, biomechanist and barefoot running expert.  Dr. Davis is the director of the Spaulding National Running Center at Harvard.  The few paragraphs that follow are to present the material that Dr. Davis discussed during her lecture, and to give some personal thoughts.

It may not surprise you, but Dr. Davis was a huge advocate of barefoot running.  She gave several personal and patient related anecdotes about the therapeutic benefits to running barefoot.  Also, to cement the facts of her argument, she threw numerous peer-reviewed and published articles at us.

Her first point of emphasis was the biomechanical concept, ground reaction force (GRF).  GRF is defined as the force exerted by the ground on a body in contact with it.  In other words, if you punch the ground it will most likely hurt because the ground will produce a force acting back onto your hand.  The larger the force applied to the ground, the larger the force applied back onto the object (in this case your hand).  However, you can decrease the effect of the force by producing the force over a large amount of time.  Lets use the punch example again.  If you place your hand on a wall as if to punch it and apply 100 pounds of force over 10 seconds you probably will only feel slight pressure applied back to your knuckles.  However, if you strike the wall with 100 pounds of force over 0.5 seconds (like a punch) you will likely do some damage to your knuckles.  In both cases, the same amount of force was applied, but subsequent reaction is decreased when spread out over a larger amount of time.  This is called loading rate.

Back to running.

This brings me to the next topic, foot strike.  When people run, we see a few general patterns of foot strike.  Foot strike is how the foot initially makes contact with the ground after each stride (aka at the termination of swing phase).  The different types of foot strike were grouped into a few categories, and to simplify they can be either rear foot strike (RFS) or forefoot strike (FFS).  RFS is when your calcaneus (heel) makes contact with the ground first, and FFS is when the ball of the foot strikes the ground first.  There are three benefits to FFS, 1) decreased loading rate, 2) no impact peak which is present in RFS when the calcaneus strikes the ground, and 3)allowing the arch to drop to absorb force (more on this later).  Decreasing loading rate and having no impact peak, decreases the amount of force exerted up the kinetic chain on hard tissue structures (aka bones and joints).  With a RFS pattern, common problems such as tibial stress fractures, shin splints, and knee/ hip pain was prevalent.  With the FFS, greater stress is applied to the soft tissue structures.  Dr. Davis says that barefoot running forces the runner to strike with the forefoot.  Please refer to the figures below of GRF plotted vs. time.

RFS GRF

FFS GRF

Does running barefoot strengthen the intrinsic foot muscles?  Dr. Davis’ research says that it does.  Is this important?  Yes!  The intrinsic foot muscles, as well as the extrinsic eccentrically contribute to force absorption by allowing the arch to drop, which is what its supposed to do!  Dr. Davis believes that giving orthotics to someone with a non-congenital flat foot, only exacerbates the problem by never re-educating the muscles to fire like they are intended.  She believes that orthotics (or arch support) should be of temporary service to the patient or client, and that they should be weaned off of them progressively.  Dr. Davis further stated that barefoot running is a functional and fun way to strengthen the muscles of the feet.

The last point that I will discuss is the use of minimalistic footwear.  Dr. Davis prescribes the Vibram five-finger shoe to her friends and clients, because she says it allows the foot to act like a foot while providing some additional protection.  She also made the claim that there are other minimalistic shoes out there that serve the purpose, and that typical running shoes with large heel pads are only increasing the prevalence of rear foot striking.  She claimed that people think that because of the built in arch support and increased heel protection, it decreases the force placed onto the body.  She said that this could not be further from the truth.

So what are my thoughts?

1.  Foot strike patterns–>It is hard to debate her biomechanical analysis of foot strike patterns and gait mechanics.  So, I am going to believe the source on this one and understand that it is probably best to strike on the mid or forefoot when doing repetitive running.  Furthermore, watch the best athletes in the world run.  Whether you are watching Olympic track and field or the NFL, those athletes are not running heel to toe.

2.  Orthotics–> I really liked what she said about weaning the patient off of orthotics.  She used the example of a neck brace.  When a person injures their neck, do we keep them on a neck brace forever?  Of course not!  We allow the injury to heal, regain range of motion, and strengthen the musculature around the neck to do its job…hold the head up!  In using this example, it makes sense that we should allow the foot to do its job by allowing the arch to drop and absorb force. Pronation is a natural part of gait, we just do not want it to be excessive.  On the other hand, if the flat foot is congenital or architectural, this may not apply.

its not supposed to look like this

3.  Minimalistic footwear–>I like minimalistic footwear.  I am on my 4th year of wearing minimalist footwear, and my feet and knees feel great!  Can I attribute all of my painlessness to my footwear? I am not sure, but I don’t think so.  I agree that intrinsic and extrinsic foot function is of utmost importance for health and performance, but I am not going to agree that the best way is barefoot running.  It very well maybe, and obviously there are many benefits of allowing the foot to act like the sensate instrument that it is.  However, there is more than one way to skin a cat, but I am partial to strength and conditioning.  A well structured lower quarter resistance program will awaken the neuromuscular system to allow proper functioning.  A little trick to get more bang for your buck is to warm-up and do posterior chain and standing exercises barefoot!  I do not run barefoot.  I like the concept, and understand that it may help you adopt a more natural footstrike, but you wont ever catch me running down Broad Street unprotected!  In addition to this, I would not buy the five-finger shoes.  I will keep buying my $80 minimalistic shoes, train hard, run with proper mechanics and use the $30 I saved on other things that I enjoy (see picture below)!

This is where I will be very soon. What will I wear on my feet? Well, golf shoes of course!

Leave a comment

Filed under Uncategorized

Exercises You Should Try: Unilaterally Loaded Reverse Lunge from Deficit

Today’s entry is a series that I will post from time to time.  In each installment, I will present one exercise and highlight its benefit to a program.  The topic I present could be a mobility or warm-up exercise, resistance or plyometric exercise, speed drill, or anything in between.  The purpose of this series is to give the reader a look at some exercises that may be totally new, challenging, or present a variation/ correction to an exercise that is already performed in their program.

Exercise:  Unilaterally Loaded Reverse Lunge from Deficit

Technique Cues: Neutral neck/ neutral spine, big chest, shoulders back and down, vertical lead shin, hind knee more posterior than ipsilateral hip to promote hip extension mobility, kettlebell or dumbbell held tight and next to side

Benefits:

1) Unilateral Leg Strength

2) Hip Extension Mobility in Hind Leg and Hip Flexion Mobility in Lead Leg (increased by elevating lead leg)

3) Anti-lateral flexion Core Stabilization (because of unilateral external load)

4) Reciprocal Hip Movement (extension of lead leg, flexion of hind leg)

5) Hip External Rotation Strength/Activation (see note below)

Note:  The first 4 benefits may already be known by the reader, but the 5th is an important benefit that may not be known.  Since the exercise is unilaterally loaded (aka KB in only one hand), the lifter’s center of mass is shifted to the ipsilateral side of the load.  Therefore, without getting too scientific, the lifter’s trunk has an increased tendency to rotate towards the stance leg (in the picture above, my right shoulder wants to rotate toward my left knee).  If you are on one leg, and you rotate your trunk towards that leg, your hip is relatively internally rotated.  In order to keep the hip in neutral/ out of IR, the lifter must contract his/ her glutes / external rotators.

See Video by Clicking Link Below and Give it a Shot.

http://www.youtube.com/watch?v=4Se3Aft7jzM

Leave a comment

Filed under Uncategorized

Roux Strength Training Interview from 2009

A few years ago my friend, Dustin Roux, asked me to be a part of a strength round table for his site.  Since then, he has opened up his own athlete performance gym in Pittsburgh, and I am one third of the way through PT school.  Needless to say, we both have learned a lot since then, and developed new theories and methodologies.  However, with a few exceptions, there are some good points from the interview, so I thought I would share.  At that time in my career I didnt fully understand the importance of mobility, especially in regards to hockey players and poor hip mobility.  Likewise, I am now much more of a proponent of single leg strength and stability, and the reciprocal  neurological reflexs that our body is born with (think cross-extensor) . With that said, here is my portion of the interview.  If you are in the Pittsburgh and serious about training, check out his gym, Roux Strength (rouxstrength.com).  You can also view the entire interview at inlinehockeyperformance.com.

Roux: Guys, it’s great to have everyone on board for this. I think these roundtables will be a great resource for all the players and coaches reading our site. For our first question, I would like to know what you would do with your athletes if you could only use 5 exercises. Which 5 would you use, and why?

DeLorenzo: As far as my top 5 exercises (and I am speaking in regards to Ice/ Roller Hockey and in no particular order)

1) Front Squat- research shows that front squats place less compressive forces to the lumbar spine and knees when compared to back squats. I am by no means saying that I would never have anyone back squat, but I am partial to the front squat.

2) Deadlift Variations- I think it has been well documented how important posterior chain development is for athletics, so this doesn’t need much of an explanation. Likewise, since hockey is a quad-dominant sport, the addition of hip dominant exercises is of utmost importance when taking into consideration that the athlete needs to be balanced. Think asymmetries.

3) Horizontal Pull variations (Rows) – Even though I strongly believe the pull up and chin up are the pinnacle for upper body strength development, we are talking about what hockey players need. Therefore, rows not only help with the thickness of the back’s musculature, it has also been proven to improve posture and shoulder function (decreasing rotator cuff and impingement problems). These reasons, in my eyes, are important in a sport where you are already in a “hunched” position.

4) Core Stabilization Exercises (more details later in interview).

5) Unilateral (Single) Leg Exercises- If I had to pick just one I would go with the walking lunge, but all unilateral leg exercises can be beneficial. Unilateral movements are great for mobility of the hip, stability of the knee and single leg strength (among other things), which are obviously important in hockey.

deadlift...a total body exercise

Roux: Since I got about 10 emails regarding our Abs training guide…Your top 3 ab exercises, name ‘em..

DeLorenzo: Well, when it comes to abdominal training in athletics the first thing that comes to mind is the word “stability.” In functional anatomy, it is important to know that each muscle has two functions…

1. Movement

2. Stabilization or “Anti-Movement”.

Therefore, two of my next three exercises are geared towards anti-movements. Assuming the program includes Squats and Deadlifts (which are great anti-flexion movements), I would include an anti-extension movement, an anti-lateral flexion movement and an anti-rotation movement into my program. Some great anti-extension movements are plank variations, including the roll-out, the body saw, and the basic plank (and its variations). When it comes to anti-rotation movements I think the pallof press is near the top of the list, as well as cable chop and lift variations. Lastly, I am going to go with the reverse crunch or hanging leg raises. This is an ab exercise that reverses some of the effects of the continuous “rib cage to pelvis” movement that so many of us get when doing endless crunches (which once again does not help when we are already in a sport with a “hunched” posture, and a lot of shoulder injuries!).

neutral...stable

pallof press...anti-rotation at its best


Roux: Now, lastly.. I thought it would be a great way to wrap up all this awesome information with a “your choice” question. As a strength coach, imagine you have an athlete who has the perfect strength program on paper.  What else would you emphasize to them?

DeLorenzo: This last question is very difficult because there are so many ways to answer. As much as I think soft-tissue work (to improve tissue quality) is important, I am going to go with nutrition. While at PennState, we had the opportunity to consult Dr. Kristine Clark. Dr. Clark is a top-notch sports nutritionist. She once told me that “what you do in the kitchen is as, if not more, important than what you do in the weight room.” This includes everyday nutrition, game day nutrition, pre/post workout nutrition, etc.

Roux: Thanks for your contribution, Luke.

DeLorenzo: My pleasure. Thanks.

Leave a comment

Filed under Uncategorized

Arthrokinematics: An Important Biomechanical Concept

Today I am going to cover a topic that I did not learn until PT school.  I feel as though the topic of arthrokinematics is important for health and fitness professionals to know because it explains why and how to mobilize basically any synovial joint in the human body.  It is obvious that a manual therapist or orthopedic specialist would find it necessary to obtain this knowledge, but I can also make the case that a fundamental background would benefit the fitness professional as well.  Arthrokinematics is defined as the study of the motions that occur within joint spaces during bone movements.   Most of the joints that we as PT’s or fitness professionals are interested in fall under the category of synovial joints.  Some examples of synovial joints are the knee, ankle, hip, wrist, elbow, shoulder, joints of the foot and hand, and all of the facet joints of the spine.  By definition, synovial joints, differ from other joints because of they are enclosed by a joint capsule which is filled with synovial fluid (basically a lubricating fluid that is necessary for movement).  Please see image at right for visual.

In general, joints in the body are in a convex/concave relationship, which allows for greater surface area for the bones to contact each other; increasing joint stability, dissipating compression forces, and providing more guidance for movement.  These convex/concave relationships govern the rules for arthrokinematics.  Before we get to the “convex/concave” rule for synovial joint movement, we need to know the accessory movements that are available.

The three accessory movements include: Roll, Glide, and Spin

An example of roll would be during a soccer kick or a lateral raise.  Both the tibia and the humerus roll superiorly during the kick and concentric portion of the exercise respectively.  An example of spin is at the humeroradial joint during pronation and supination.  Here, the radius spins about a fixed humerus.  There is negligible roll or glide during spin.  An example of glide would be at the facet joints of the vertebral column. During a toe touch stretch, for example, the superior vertebra glides superiorly on the fixed inferior.  The opposite is true during extension of the spine.  Please see picture for visual of glide.  The facet joints in the picture are underneath the black arrows.  Note how the articular surfaces of the vertebrae are approximated during extension.

If the two articulating surfaces are convex/concave, the rule can apply.  The convex/concave rule for arthrokinematics has two parts.

1. If a convex surface moves upon a fixed concave surface, the roll and glide are in opposite directions. (ex. femur rolling and gliding upon a fixed tibia during a squat or deadlift)

2. If a concave surface moves upon a fixed convex surface, the roll and glide are in the same direction. (ex. tibia rolling and gliding on a fixed femur during a leg extension)

Lets take a look at a few more examples.  Elbow during bicep curl=ulna rolling and gliding in same direction upon a fixed humerus.  Hip abduction= femur rolling superiorly and gliding inferiorly upon a fixed acetabulum (hip bone).  Close kinetic chain ankle dorsiflexion/ plantarflexion as in a squat=tibia/fibula rolling and gliding in the same direction upon a fixed talus.

Starting to get the idea?

With a little anatomy knowledge (or by taking a quick look in any atlas), we can easily conclude the shape of the articulating surfaces, and thereby understand which way to mobilize.  Furthermore, it is important to understand when to use this principle.  Arthrokinematics should only be used with joint mobilization in mind.   It is not necessary to increase muscular extensibility, but performing both together can save time.  Joint mobilization is used to increase the ROM of the inert or non-contractile structures surrounding the joint, namely the joint capsule and ligaments.

I think it is easy to understand how increasing joint play is important and how this can be used in rehabilitation of injuries.  Specifically injuries that have left patients with decreased range of motion due to immobilization.  But how does this apply to healthy athletes or clients looking to increase their range of motion?  Below are a few examples of how using an exercise band can increase range of motion using the principle of arthrokinematics.  I am by no means suggesting that static stretching should be eliminated.  Remember, joint mobilization does not facilitate muscle lengthening.  But, there are times when both can be used simultaneously.   These examples are some of the more relevant because lack of hip extension and ankle dorsiflexion ROM is quite common.

Please click the link below to view :

Talocrural Joint Mobilization with Tibial Glide

http://www.youtube.com/watch?v=RM0uBIN8iWo

Half Kneeling Hip Flexor Stretch with Femoral Glide

http://www.youtube.com/watch?v=QOH3GbRUFFo

Rectus Femoris Emphasis

http://www.youtube.com/watch?v=u1dN8VA_RCE

Leave a comment

Filed under Uncategorized

Postural Assessment

My first post is about a topic that has been well covered, and for good reason.  Both static and dynamic posture is of utmost importance in regards to maximum performance no matter what your performance measure.  Optimal postural alignment is a well sought after goal by fitness professionals, personal trainers, athletic trainers, physical therapists, and the like. Instead of discussing specific postural topics such as the implications of spinal coupling mechanism on scoliosis or rear foot valgus (perhaps topics for a later date), I will give a quick and cost efficient way to objectify postural mal-alignments.  This technique is very simple, yet it takes a keen eye to identify the origin of the mal-alignment.  In addition, it is by far more difficult to identify the cause.

The are many ways to assess posture, but this technique uses a plumb line (a fishing sinker and yarn), which gets a little help from gravity, and subsequently hangs perpendicular to the ground.  One of the benefits of this technique is that within a few easy snapshots, the assessor can display his/her work, and allow the client to view their progress.  The plumb line makes it easier for the untrained eye  (i.e. the client) to view postural faults.  I believe that in most instances, allowing the client or patient to view themselves will help build rapport and hopefully help the client feel that their money is being well spent.  The basis for the entire technique is that the plumb line is to dissect or pass within a certain proximity to a predetermined set of ‘reference points’–bony landmarks that differ based on the position of the subject.  The patient or client is placed in three different positions, and assessed in a standing.  Below is a list of these reference points, cephalad to caudal, in each of the three positions.

Anterior (Frontal) View                           Sagittal (Lateral) View          

  1. Through Center of Nose                          1.  Through Ext. Auditory Meatus
  2. Though Xiphoid Process                         2.  Through Acromion
  3. Umbilicus                                                      3.  Through Greater Trochanter
  4. Between Knees                                            4.  Between Knee Axis and Patella
  5. Midway between Ankles                         5.  Just Anterior to Lateral Malleoli
 Posterior (Back) View                    
1.  Center of Occiput
2.  Through Spinous Process of Vertebrae
3.  Through Intergluteal Cleft
4.  Between Knees
5.  Between Medial Malleoli
         

To the left is an example of “good” and “poor” postures in a sagittal (Lateral) View.  The dotted line in the middle view represents the plumb line, and it can be easily seen that one or more landmarks are out of alignment in the “poor” posture views.  With that said, and somewhat stated in the image, abnormal postures can contribute to weak or inhibited musculature in some places, and overactive soft tissue in others.  To aid in the understanding of this concept, I will go into a little further detail regarding forward head posture, a common postural fault in our society.  To be quite honest, you are most likely donning this position while reading this.  Some athletes that suffer from it are cyclists, baseball pitchers, and hockey players.  In short, forward head posture is a flexed lower cervical and hyper-extended upper cervical spine.  As seen in the picture to the right, hyper-tonicity 
on one side of the body (ex. upper trap, levator, suboccipitals), usually leads itself to hypo-tonicity on the opposite (ex. deep neck flexors).  The therapeutic goal is to restore some kind of balance by returning these tones to ‘neutral’.
As stated before, there are many ways to assess posture.  It can be done statically, dynamically, in a structured manner, or just by assessing someone during exercise.  With that said, this technique is not meant to be an ultimate or an all-inclusive, but merely a tool in one’s professional toolbox.  If nothing else, my hope is that it can give someone a reference to understand how the body should align.  Even without taking the time to set up the entire technique, one could, for example, note that a client’s ear is not centered over the acromion, and therefore hypothesize forward head posture.

Leave a comment

Filed under Uncategorized